
Creating templates
Template functionality makes it possible to automate installation and configuration of jobs across the entire database farm you are managing.
The configuration interface is available in the menu Server -> Server Configuration -> Edit job templates

There are 5 templates available in dbWatch Control Center:
- Default (all platforms)
- Test (MS SQL Server)
- Test (Oracle)
- Maintenance (MS SQL Server)
- SQL Performance

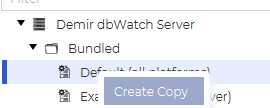
You can not change or delete a bundled template. To create your own templates, you can either right-click on a bundled or local template and choose to “Create Copy”, then enter a new template name.
Or you can click on “New” to create a new empty template with no contents.

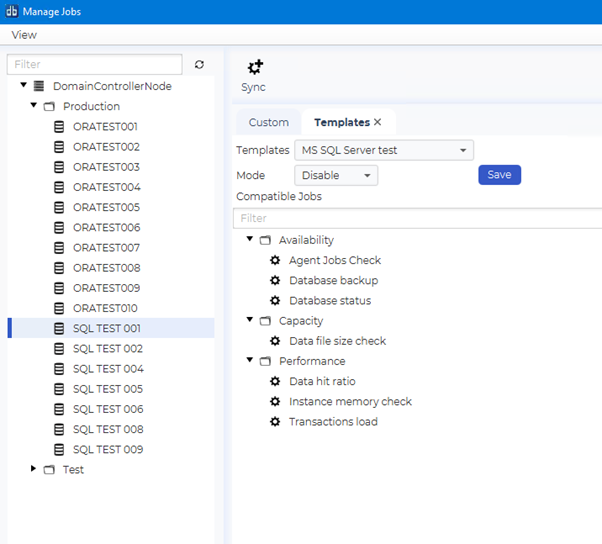
This interface will list the jobs that is part of the template, and if they have overrides in schedule or configurations. They are grouped by job groups such as “Availability”, “Capacity” and “Performance”.

In the edit job template GUI, you can click on the blue “Add jobs” button to add new jobs to the template.

And you can choose to change schedules or parameters on the jobs.

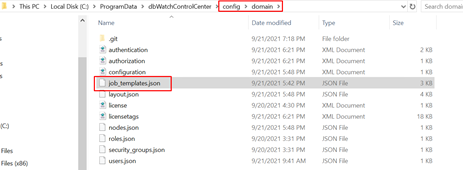
The results of any changes are stored as a json file (“job_templates.json “) in the “config/server” directory (“C:\ProgramData\dbWatchControlCenter\config\server”).
Deploying templates
Templates are deployed in the “Manage jobs” view (Server -> Server Configuration -> Manage jobs)
When you install dbWatch jobs using template there are 3 different options regarding what to do with jobs that are already installed on the instance.
- Keep others
- Disable others
- Uninstall others
The default value is “Keep others” which means that jobs which are already installed will be unaffected. If you want to uninstall all jobs which are not specified in a template you have to add a metadata “jobtemplatemode” with value “Uninstall others” and “Disable others” will only disable the jobs that are not part of the template.

Both meta data (“jobtemplate” and “jobtemplatemode”) can be set using “Manage Jobs” GUI. For each instance go to the “Template” tab and specify template name and installation mode, and then click save. It is also possible to deploy several templates to one instance. In that case jobs from all templates will be merged.
If you are going to add templates to several hundred of instances, we recommend to use “Edit metadata” GUI.
Go to the main menu, select “Server”, “Server configuration”, and then “Edit metadata”

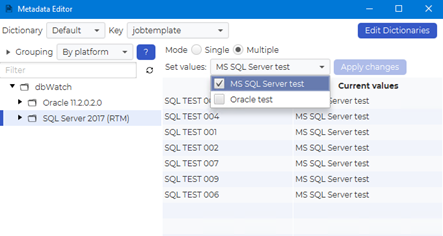
Then select Dictionary «Job Templates»

In this dictionary, two metadata are defined, “jobtemplate” with values that refer to all template names found in the job_templates.json file, and “jobtemplatemode” with three values, keep, uninstall and disable.
In Metadata Editor you can easily add metadata to many instances in the same view.
Select the correct “Key”, then “Mode”. If you select “Single” mode, you must select a value for each instance.
If you select “Multiple” mode, you can add a specific value to many instances at once.
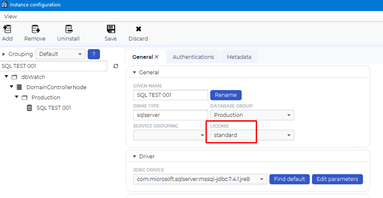
It is important to remember that the instances, where you want to install jobs from a template, must have a “license”. If the “License” value is empty, it will not be possible to install any jobs at all.
The license (in this case “standard”) is also linked to a list of jobs that you are allowed to install on an instance. If, for example, template jobs (from the template “MS SQL Server test”) are not in the “standard” list, then no jobs from this template will be installed.
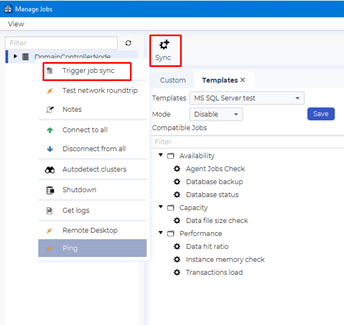
To trigger deployment of a template on an instance (or many instances) click on “Sync” in “Manage Jobs” GUI, or right click on “DomainControllerNode” and select “Trigger job sync”.
You can monitor deployment of templates in “Internal jobs” view.

Post your comment on this topic.