Cloud router
Setting up a cloud router.
A “Cloud Router” is a dbWatch Node that securely forwards messages. It must be in a network where both the client and server can reach it.
A Cloud Router setup requires a separate license.
For security reasons you do not want the cloud router to be a domain controller, and you do not want it to be part of the domain you want to connect to.
So, to set up a cloud router, you need a separate dbWatch domain that this router will be a part of.
Lets assume you have two domains “prod.acme.com” and “router.acme.com”.
“prod.acme.com” is your existing production environment with one or more dbWatch Servers.
“router.acme.com” is the router domain you want to set up.
Step one
Install a domain controller for the “router.acme.com” domain. This should be in a secure network location.
Step two
Install and configure the routing node.
For Windows servers, the default configuration location is:
C:\ProgramData\dbWatchControlCenter\config
This replaces /var/dbwatch-controlcenter/config used on Linux systems.
The directory layout and file names are otherwise identical.
Install the routing node package
Install the dbwatch-controlcenter package on the server that will act as the Cloud Router.
This node must be able to communicate with both the dbWatch domain controller and the client(s).
Scripts for configuring and tuning the Cloud Router is available from Github :
Github link
Verify and tune system parameters
The Cloud Router is intended to be lightweight and efficient.
Run the setup script (dbwatch_cloudRouter.sh) or verify manually that the following parameters are configured:
In /var/dbwatch-controlcenter/config/server/server_configuration.xml:
<scheduler-thread-pool-size>5</scheduler-thread-pool-size>
<thread-pool-size>100</thread-pool-size>
In /var/dbwatch-controlcenter/config/node/tuning.properties:
Scheduler.threads.count = 5
Scheduler.threads.sleep = 2
These values ensure the router limits resource usage and does not run unnecessary background tasks.
The setup script will prompt to correct these values if they are different.
Configure router.json
The router’s access and forwarding behavior is defined in:
/var/dbwatch-controlcenter/config/node/router.json
Example configuration:
{
    "discovery":"false",
    "forwarding":"true",
    "rules":[
        "ALLOW 127.0.0.1/32 0.0.0.0/0 100",
        "ALLOW 192.168.0.20/32 0.0.0.0/0 100",
        "DENY 0.0.0.0/0 0.0.0.0/0 -1"
    ]
}
“discovery” should normally be set to “false” to prevent the router from automatically advertising itself.
If it is “true”, the setup script will ask if you want to change it to “false”.
“forwarding” must be “true” to allow routing.
The setup script ensures this setting is correct.
“rules” define which hosts can establish connections through the router.
Each rule has the following format:
ALLOW/DENY FROM-HOST TO-HOST MAX-CONNECTIONS
TO-HOST and MAX-CONNECTIONS are currently informational only.
Configure services.json
The Cloud Router also requires a service definition file to register with the governing domain.
Check or create the following file:
/var/dbwatch-controlcenter/config/services.json
Example:
{
    "services:Entity": [
        "service.cloudrouter:router@domain:router.acme.com"
    ]
}
Configure governing domain
Each Cloud Router must know which domain controller governs it.
Check or create the following file on the Cloud Router:
/var/dbwatch-controlcenter/config/node/governingDomain.json
Example:
{
    "domain":"router.acme.com"
}
If this file does not exist or has the wrong domain name, run the setup script (dbwatch_cloudRouter.sh)
and enter the correct domain controller name when prompted.
This ensures the router correctly reports to its domain controller.
Note:
After adding the routing node, you might need to copy the PEM files from the router domain controller’s trustStore directory
to the Cloud Router’s trustStore directory located at:
/var/dbwatch-controlcenter/config/node/trustStore
This ensures secure certificate-based communication between the router and the domain controller.
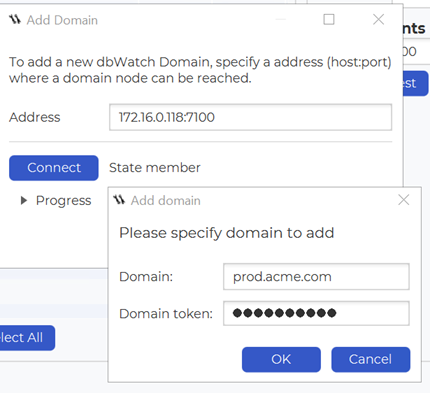
Add the routing node to the router domain
Add the routing node to the “router.acme.com” domain using dbWatch Control Center.
Confirm that the node appears in the domain configuration list.
Step three
Add a connection from one (or more) of the server(s) in the “prod.acme.com” domain to the Cloud Router.
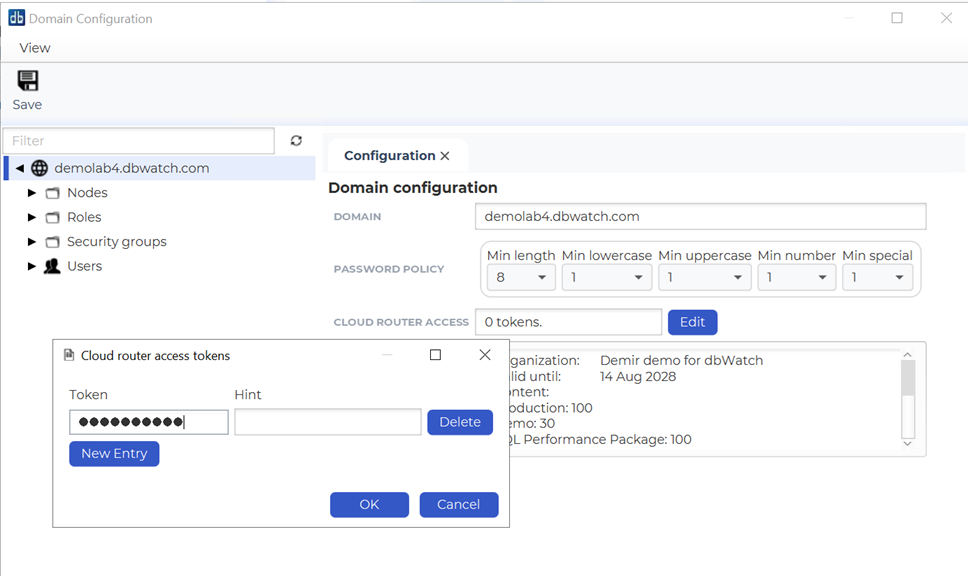
To allow a dbWatch Monitor or Server to connect to “prod.acme.com” through the Cloud Router, you must define a Cloud Router access token.
This token is used to authenticate and authorize incoming routed requests to the production domain.
The access token is configured from within the dbWatch Control Center:
1. Open “Domain Configuration” for the prod.acme.com domain.
2. Select “Edit” in the Cloud Router Access section.
3. Click New Entry to create a new access token.
4. The token value will be displayed as dots for security reasons. If you manage multiple tokens, you can assign each a Hint to distinguish them.
5. Copy the token value for later use when configuring Cloud Router connections.
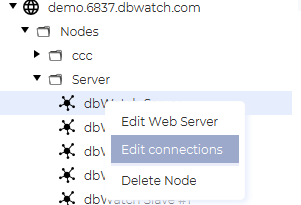
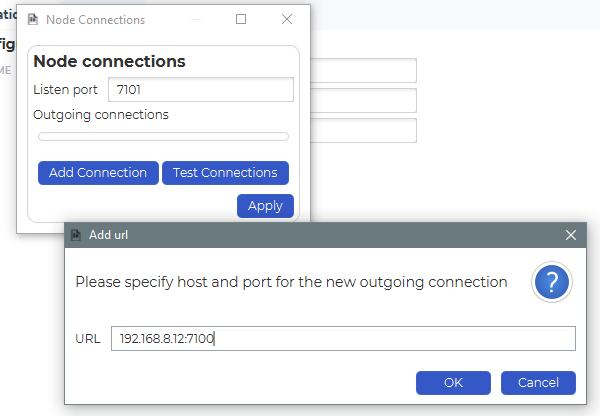
Once the access token is defined, proceed to add a connection between the production domain server(s) and the Cloud Router:
1. In “Domain Configuration”, right-click on a Server and select Edit Connections.
2. Click Add Connection and specify the host:port of the Cloud Router.
3. Paste or select the access token created earlier when prompted.
Step four
Connect the client to the Cloud Router. Adding the client to the “prod.acme.com” domain works the same as a direct server connection, except that you must also provide the Cloud Router access token.
Optional network optimization
Nodes in dbWatch have a network cost associated with them. This is used when routing messages to figure out the optimal route for messages to travel.
If you are setting up a network with redundancy (f.ex that there are multiple cloud routers connecting your networks) you might want to tweak the cost settings of the nodes in order to assure that a certain path is preferred.
By default, passing a message through a node has a cost of 128. So sending a message through two jump nodes will mean a cost of 256, in this way a shorter route will always have a lower cost, and thus be preferred.
In addition to the base cost of 128, a node will try to determine how powerful the underlying machine is and add a cost between 1 and 10 to reflect this. So a node running on a more powerful machine will tend to have a lower cost.
If you are not happy with the computed cost, there is an optional extra that can be added. This is defined in the “[dbWatch Work]/config/node/node.connections” file.
Example file:
{
	"versionCutoff":"",
	"nodeCost":"0",
	"listenTo":[
		"dbw://localhost:7101"
	]
,	"connectTo":[
		"dbw://192.168.8.12:7100"
	]
}
The “nodeCost” value can be adjusted to any number you want, this will be added to the base node cost. (This can also be a negative number, to subtract from the base cost).
Changing this setting is not currently dynamic, so the node must be restarted for changes to take effect.