Installing Push Backup to Shared Devices
To install Push Backup to Shared Devices, follow these steps:
Right-click the SQL Server instance you want to perform the push backup from.
Select Configure Jobs.
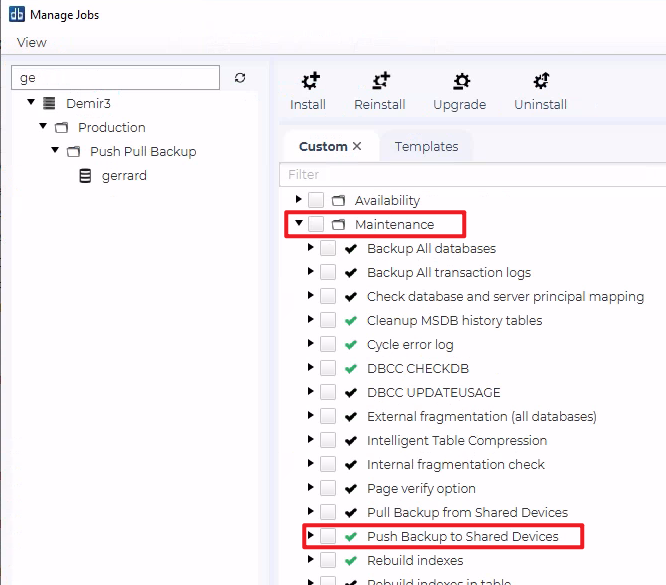
Navigate to the Maintenance category.
(You will find it under: <Instance> → Maintenance.)
Locate Push Backup to Shared Devices in the job list.
Check the box and click Install.
The job is now added to the instance’s job list and ready to be configured.
Configuring the Job
After installation, click the job to open the configuration window.
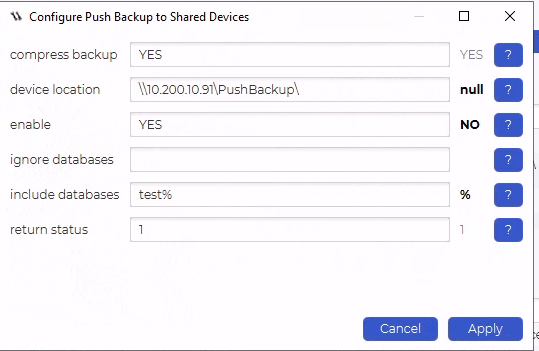
The following parameters are available:
compress backup
YES / NO
If set to YES, dbWatch adds the SQL clause:
WITH COMPRESSION
to the BACKUP DATABASE command.
Notes:
Compression reduces backup size and speeds up backup operations.
Not supported on SQL Server Express Edition.
Not supported on SQL Server 2005.
device location
UNC path to shared storage, e.g.
\\10.200.10.91\PushBackup\
This defines the shared location where the SQL Server Shared Device files will be stored.
Important notes:
Only DISK type backup devices are supported.
dbWatch will automatically create the shared backup device during job execution if it does not already exist.
The SQL Server service account must have read/write access to this shared path.
enable
YES / NO
A safety switch controlling whether the job is allowed to run.
YES → The job will create devices and perform backups.
NO → The job will skip execution, preventing accidental device creation or unintentional backups.
This is useful during testing or when temporarily disabling the push backup workflow.
ignore databases
Comma-separated list of database names or patterns to exclude.
Supports SQL-style % wildcard.
Examples:
test% → Excludes all databases starting with “test”
tempdb, master, msdb → Exclude specific databases
Rules:
Ignore filters take precedence.
If a database matches both ignore and include, it will be excluded.
include databases
Comma-separated list of database names or patterns to include.
Supports % wildcard.
Examples:
test% → Include all databases starting with “test”
%prod → Include all databases ending with “prod”
Rules:
Only databases matching this list will be backed up.
However, if a database matches both include and ignore, the ignore rule wins (the database is excluded).
return status
Controls what alert level the job should raise when errors occur:
0 = OK
1 = WARNING
2 = ALARM
If any database backup fails, the chosen status value will be returned to dbWatch monitoring.
Installing Pull Backup from Shared Devices
To install Pull Backup from Shared Devices, follow these steps:
Right-click the SQL Server instance you want to perform the pull backup from.
Select Configure Jobs.
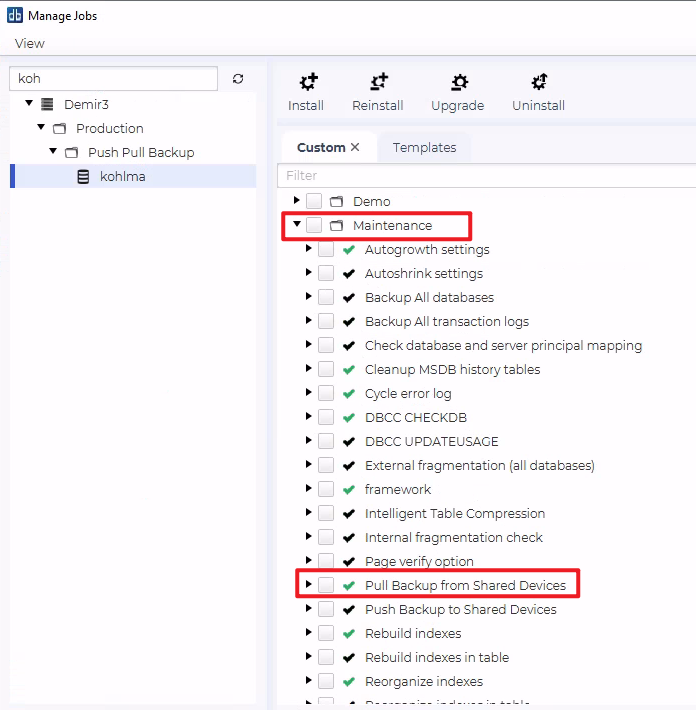
Navigate to the Maintenance category.
(You will find it under: <Instance> → Maintenance.)
Locate Pull Backup to Shared Devices in the job list.
Check the box and click Install.
The job is now added to the instance’s job list and ready to be configured.
Configuring the Job
Configuration Parameters — Pull Backup from Shared Devices
When the Pull Backup from Shared Devices job is installed, it allows a SQL Server instance to automatically restore databases from shared backup devices created by the corresponding Push Backup job.
Below is a detailed explanation of every configuration parameter.
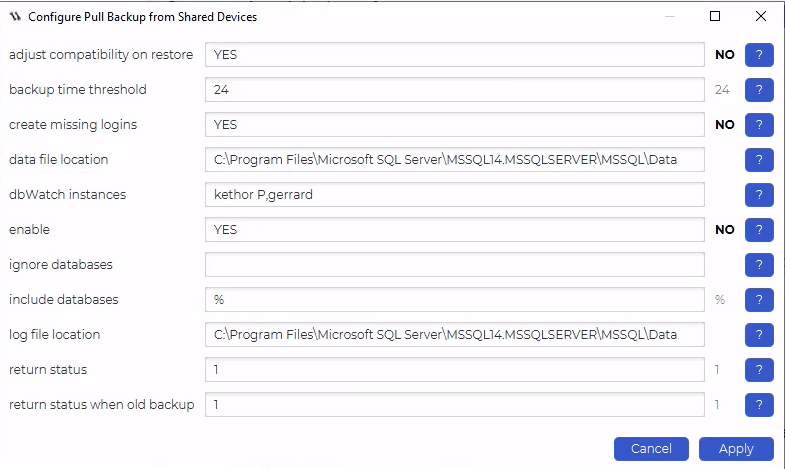
adjust compatibility on restore
YES / NO
If set to YES, dbWatch will automatically adjust the restored database’s compatibility level to match the default compatibility of the target SQL Server instance (the same level used by the master database).
If set to NO, the restored database keeps its original compatibility level from the source instance where the backup was taken.
This ensures restored databases behave correctly on newer SQL versions.
backup time threshold
Number of hours
Defines the maximum allowed age of a backup to be restored.
If the backup file on the shared device is older than this threshold, the job can return a warning or alarm depending on the return status when old backup setting (parameter 11).
Example:
24 → Only restore backups newer than 24 hours.
create missing logins
YES / NO
If enabled, dbWatch will automatically create missing SQL logins associated with the restored databases.
Rules:
Existing logins on the local instance are not overwritten.
Only logins that do not exist will be created.
This helps maintain access continuity after restore.
data file location
Path to restore .mdf / .ndf files, e.g.:
C:\Program Files\Microsoft SQL Server\MSSQL14.MSSQLSERVER\MSSQL\Data
Specifies where dbWatch should place the data files during the restore process.
The job will automatically move the restored database files to this directory.
dbWatch instances
Comma-separated list of dbWatch-registered SQL Server instance names
Example:
kethor P,gerrard
The job will attempt to restore databases from these instances, using backups found on the shared device that were previously created by the Push Backup to Shared Devices job.
This allows multi-source pull restore workflows.
enable
YES / NO
A safety switch that determines whether the job is allowed to run.
YES → The job executes the restore process for each shared device.
NO → The job is skipped entirely, preventing accidental restores.
ignore databases
Comma-separated list of database names or patterns to be excluded from restore.
Supports the wildcard %.
Examples:
test% → Excludes all databases starting with test
tempdb, master, msdb → Excludes specific system databases
Ignore takes precedence over include (parameter 8).
If a database matches both, it is excluded.
include databases
Comma-separated list of database names or patterns to be restored.
Supports % wildcard.
Examples:
test% → Restore all databases starting with test
%prod → Restore all databases ending with prod
If a database matches both include and ignore patterns, it is still excluded, since ignore has priority.
log file location
Path to restore .ldf (transaction log) files, e.g.:
C:\Program Files\Microsoft SQL Server\MSSQL14.MSSQLSERVER\MSSQL\Data
This specifies where the restored database’s transaction log file will be placed.
return status
Return status when the job encounters restore errors.
Values:
0 = OK
1 = WARNING
2 = ALARM
If any database fails during restore, the job returns the selected alert severity.
return status when old backup
Return status when a backup is older than the defined backup time threshold (parameter 2).
Values:
0 = OK
1 = WARNING
2 = ALARM
This allows administrators to detect stale or outdated backups even if the restore succeeds.
Additional Note — TDE Encrypted Databases
If a database is protected with Transparent Data Encryption (TDE), the restore will fail unless the target instance has the correct TDE certificate and private key imported.
dbWatch does not copy encryption keys.
Administrators must transfer them manually before using push/pull backup on encrypted databases.
Reporting and Job Execution Details
Both Push Backup to Shared Devices and Pull Backup from Shared Devices include a comprehensive reporting system that provides full insight into each execution cycle.
After every run, dbWatch Control Center generates a detailed report containing several categories of operational information and results.
Scheduling Requirements for Push and Pull Jobs
Both Push Backup to Shared Devices and Pull Backup from Shared Devices must be assigned a valid schedule in dbWatch Control Center. Neither job will run automatically unless a schedule is configured.
Proper scheduling is essential to ensure that database backup and restore workflows execute correctly across environments.
Summary
Both Push and Pull Backup jobs provide:
Full traceability
Detailed operational insights
Comprehensive logging for backup and restore processes
Structured error reporting
This rich reporting framework ensures dbWatch administrators can confidently automate database transfers between environments while maintaining full visibility and control.